Safe Snowshoeing Experience in Winter Trails
I remember the morning powder lay thick on the valley, the world muffled by frost as I strapped on my snowshoes. The trail ahead glowed with ice and pine, and I breathed in the pine-scented air, thinking about how winter turns familiar routes into new adventures. Snowshoeing isn’t just a workout; it’s a careful balance of curiosity and caution. If you rush, you sink into a drift; if you linger too long, you miss the moment. Snowshoeing basics aren’t complicated, but they matter, especially on winter trails where the wind can steal warmth and direction. I’ve taken that lesson into every winter escape, linking it to summer trip, travel dreams, and the hiking I crave, even when the air bites and I recall the cozy airbnb where I stayed, shaping my safety mindset.
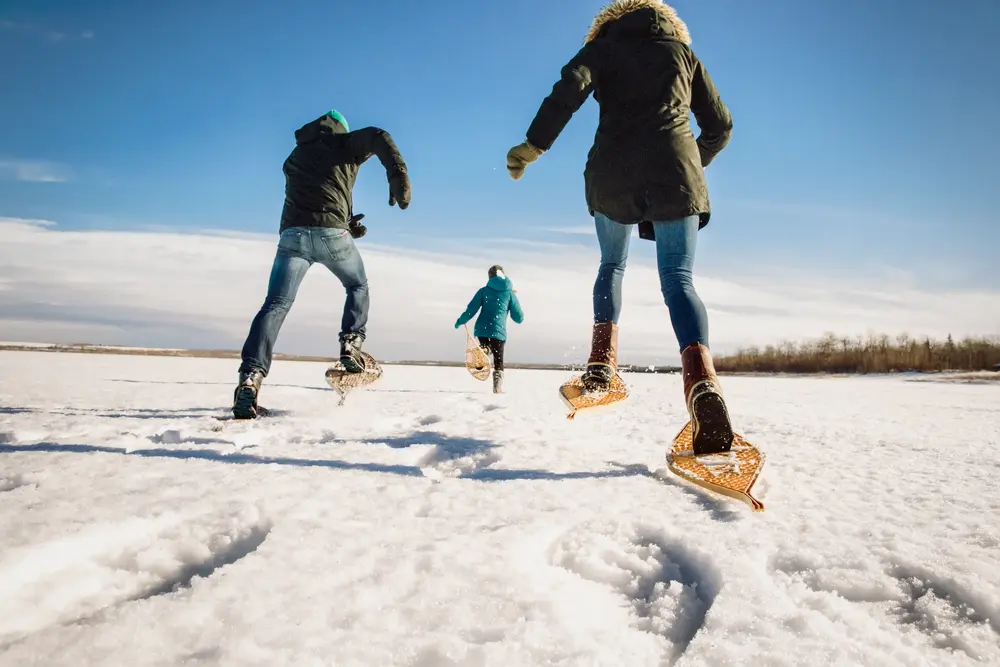
Understanding Snowshoeing Basics
Snowshoeing is simply moving with extra float on deep snow, using a rigid frame strapped to your boots and poles to help balance. The basics start with the equipment: snowshoes, poles, a moisture-wicking base layer, a breathable shell, and a small pack with essentials. Then comes technique: keep your weight centered, take short, even steps, and use the poles to steady transitions from flat sections to slight inclines. I learned to tempo my strides and to test each gust before committing to a new pace. The learning curve is forgiving when you begin on gentle terrain, progress slowly, and pay attention to footing. With patient practice, equipment basics and technique fundamentals become second nature, and a beginner stance keeps you upright.
Choosing the Right Gear
Selecting gear for snowshoeing blends practicality with warmth. The right snowshoes depend on weight, terrain, and snow depth, and you’ll want bindings that fit your boots snugly. Clothing should layer well: a moisture-wicking base, an insulating mid-layer, and a windproof outer shell. Accessories matter too: gaiters to shed snow, gloves that stay flexible, and a hat that traps heat without overheating. Footwear matters as well because cold feet ruin a day faster than a slow ascent. When I shop, I look for an all-season shell, reliable traction, and easy-access pockets for a map and snacks. Consider gear selection, insulation layers, and traction aids to stay comfortable and safe on chilly days.
Preparing for Your Trip
Before heading out, I check the forecast, map the route, and tell a friend where I’ll be. Short days in winter demand a realistic plan and an emergency fallback. I study route descriptions and note potential hazards such as wind slabs or icy sections. Pack light but complete: a compact first-aid kit, a tiny shovel or p-Raid tool, a whistle, and a flashlight with fresh batteries. I also bring extra layers, a water bottle, fuel for a snack break, and a compact thermal blanket. It helps to have a simple pacing plan and a trusted exit point. Sometimes a winter weekend includes an airbnb stay near the trailhead, which makes the trip feel more like travel than a mission.
Navigating Winter Trails
Winter trails demand attention to markers, maps, and sometimes GPS devices, especially when daylight shortens. I always carry a map folded in a waterproof pouch and set my bearings before the snow thickens. If footprints vanish or the wind sculpts drifts into new shapes, I slow down and reassess. On longer itineraries, I sketch a plan that might end at a small cozy airbnb after a long day on the winter trails. Reading terrain becomes practical as important as pace. I’ve learned that small, deliberate steps prevent slips on ice and help conserve energy. Planning ahead reduces surprises. And sometimes I reflect on how other winter sports handle friction differently; for instance, I’ve heard about ski waxing tricks that remind me to respect surface conditions on any gear.
Weather Considerations
Weather in the mountains can flip in a heartbeat. A bright morning can turn gray and windy by noon, and those shifts change how hard the snowpack pulls at your shoes. I watch cloud movement, wind direction, and the feel of the air on my cheeks. When visibility drops, I switch to a shorter loop and wait for the storm to pass. Melt-freeze cycles create slick surfaces that can surprise you just when you think you’re moving confidently. Always carry a plan B, a compass, and a phone with offline maps. In practice, this weather awareness also intersects with travel planning. I mark weather patterns, changing conditions, and safety signs as anchors on uncertain days.
Managing Physical Endurance
Snowshoeing climbs slowly but surely, and endurance matters more than raw speed. I pace myself by counting heartbeats and focusing on even, controlled breaths. I start with short distances and gradually extend them as my legs grow accustomed to the weight and resistance. Hydration is tricky in the cold, so I sip at regular intervals and keep a thermos close. Rest breaks help too, especially after a steep section or a windy ridge. I notice my ankles and knees appreciating the pause, and the calm between grunts and giggles helps me stay motivated. The key is to listen to your body, adjust the pace, and maintain a sustainable rhythm. pace, hydration, and cold endurance are inseparable companions. I also think about hiking as a warm-weather counterpart.
Avalanche Awareness and Safety
We can’t ignore avalanche risk when we venture into backcountry snow. I learned to avoid obvious wind-loaded slopes after a fresh snowfall and to identify signs of instability like cracking sounds or hollow layers underfoot. Carrying essential safety gear—beacon, shovel, probe—feels like a lifesaving routine I hope never to need, but it’s vital to practice. I test a few simple probes and practice a mock rescue with a partner to stay confident. I also chart escape routes and discuss avalanche terrain with companions before stepping onto exposed shelves. The ongoing rule—never assume safety—still holds. Even with training, you must stay vigilant about avalanche awareness, risk zones, and rescue gear.
Emergency Preparedness
When trouble arrives, calm helps more than gear. I keep a small, well-organized emergency kit: a fire starter, a compact blanket, a signaling device, and a whistle that carries across a windy bowl. I also bring a simple plan to signal for help if I’m alone, such as retracing a known route or using visible markers. The first minutes matter, so I practice quick decision-making at home, imagining scenarios from a sprained ankle to a sudden whiteout. I’ve learned that a clear list of tools and a practiced sequence makes a real difference. In my routine, emergency steps, signal devices, and first aid safety nets keep me grounded even when things go sideways. I keep one eye on the weather and one on the map.
Comparing Snowshoeing to Summer Hiking
Snowshoeing in winter shares the soul of hiking with summer trails, yet the differences feel bigger than the similarities. In snow, you weigh your body differently, and the stride becomes a gliding bounce rather than a compact step. Temperature, wind, and daylight shape routes more dramatically, so risk assessment changes from day to day. I enjoy how the quiet of a snow-covered ridge echoes the stillness I love in alpine summer hikes, but you must adjust gear, pace, and route choice. Sometimes the biggest lesson is adaptability—like comparing waxed skis and non-waxed options, you learn to pick what keeps your movement efficient and safe on the day.
My Personal Experience in Snowshoeing
Last winter I headed into a wide-open valley after a fresh snowfall, guided only by a compass and a stubborn curiosity. The wind stitched patterns on the snow and the silence felt almost cinematic. I slipped, recovered, and learned to test each step before committing to a new slope. I found joy in slow progress, the kind that feels earned, not rushed. My favorite route is a loop near a frozen river where the sun filters through larches in late afternoon. I’ve also carried gear across shallow streams wearing water shoes to keep my feet dry—though I’ll admit I prefer proper winter boots for real depth. This winter is a lot like the summer trip I took along the coast, and travel memories keep pulling me back.
Tips for Beginners
For newcomers, snowshoeing is welcoming once you drop the intimidation and start with a small, safe loop. Get a proper fit, test your balance on stable snow, and practice transitions from flat to uphill with intention. Dress in layers you can add or shed as you warm up, and snack on high-energy choices that sustain you without slowing you down. Learn to read the snow: soft powder hides crevasses and buried obstacles less obvious than it looks. Start with gentle terrain, invite a patient partner, and record your observations so you remember what works for you. The basics remain the same: stay warm, stay hydrated, and stay aware of trail markers, maps, and compass checks. If you’re planning a travel weekend, these tips apply everywhere.
Conclusion
Safe snowshoeing means embracing curiosity while respecting limits. I’ve found that preparation and a calm, flexible mindset turn a chilly day into a story you’ll tell around a stove later. You’ll have your own favorite loops, maybe near a lakeshore, or up a ridge where the sun makes ice glitter like diamonds. Remember to pack smart, adjust as conditions change, and choose routes that match your experience. The winter outdoors reward patience and practice, and I’ll keep returning to it for the same reason I chase summer memories, hiking, travel, and a sense of freedom that only the snow can offer. Let’s respect the trails, learn from missteps, and keep exploring with care.